Categories
Docker linux Security Windows Server

Setting up RDPGW in docker

I was looking into setting up an instance of RDPWG for a client.

The client currently has a bunch of Windows server VMs in Workgroup which they currently connect to on port 3389 directly exposed to the internet which is obviously a massive security issue.
Additionally, the RDP port is often blocked on corporate networks.

The better option would be to set up an Active Directory domain and an RDP Gateway server, but as a quick alternative while the client decides if the cost is worth it I set up an RDP Gateway using the Open source project RDPGW.

The project itself is very interesting but the documentation is unfortunately seriously lacking and it took me quite a bit of effort to get everything set up, so I wanted to share the results in case it helps someone.

I didn’t find a way to get RDPGW to work behind a reverse proxy, so in this setup you need 2 public IP address if you intend to host Keycloak on port 443 unfortunately.

Setup

This is the docker-compose.yml file:

version: "3.9"
services:
  postgres:
    container_name: db
    image: "postgres:14.4"
    restart: always
    healthcheck:
      test: [ "CMD", "pg_isready", "-q", "-d", "postgres", "-U", "postgres" ]
      timeout: 45s
      interval: 10s
      retries: 10
    volumes:
      - ./postgres_data:/var/lib/postgresql/data
      #- ./sql:/docker-entrypoint-initdb.d/:ro # turn it on, if you need run init DB
    environment:
      POSTGRES_USER: postgres
      POSTGRES_PASSWORD: postgres
      POSTGRES_DB: keycloak
      POSTGRES_HOST: postgres
    networks:
      - pgsql

  keycloak:
    container_name: keycloak
    image: quay.io/keycloak/keycloak
    command: ['start', '--proxy', "edge"]
    restart: always
    depends_on:
      postgres:
        condition: service_healthy
    environment:
      JAVA_OPTS_APPEND: -Dkeycloak.profile.feature.upload_scripts=enabled
      KC_DB_PASSWORD: postgres
      KC_DB_URL: "jdbc:postgresql://postgres/keycloak"
      KC_DB_USERNAME: postgres
      KC_DB: postgres
      KC_HEALTH_ENABLED: 'true'
      KC_HTTP_ENABLED: 'true'
      KC_METRICS_ENABLED: 'true'
      KC_HOSTNAME_STRICT_HTTPS: true
      KC_HOSTNAME: rdgateway-keycloak.example.com
      PROXY_ADDRESS_FORWARDING: 'true'
      KEYCLOAK_ADMIN: admin
      KEYCLOAK_ADMIN_PASSWORD: password
    healthcheck:
      test: ["CMD-SHELL", "exec 3<>/dev/tcp/127.0.0.1/8080;echo -e \"GET /health/ready HTTP/1.1\r\nhost: http://localhost\r\nConnection: close\r\n\r\n\" >&3;grep \"HTTP/1.1 200 OK\" <&3"]
      interval: 10s
      retries: 10
      start_period: 20s
      timeout: 10s
    ports:
      - "8080:8080"
      - "8787:8787" # debug port
    networks:
      - pgsql
      - keycloak

  rdpgw:
    image: bolkedebruin/rdpgw:latest
    restart: always
    container_name: rdpgw
    ports:
      - "80:80"
      - "443:443"
    volumes:
      - ./rdpgw.yaml:/opt/rdpgw/rdpgw.yaml
    depends_on:
      keycloak:
        condition: service_healthy
    networks:
      - keycloak

networks:
  pgsql:
    driver: bridge
  keycloak:
    driver: bridge

you need to create a postgres_data directory (or use a volume).

This is the rdpgw.yaml file (look a the documentation for information on secrets):

Server:
 Tls: auto
 GatewayAddress: rdgateway.example.com
 Port: 443
 Hosts:
  - rdshost-1.com:3389
  - rdshost-2.com:3389
 RoundRobin: any
 SessionKey: changeme
 SessionEncryptionKey: changeme
Authentication:
 - openid
OpenId:
 ProviderUrl: https://rdgateway-keycloak.example.com/realms/rdpgw
 ClientId: rdpgw
 ClientSecret: 01cd304c-6f43-4480-9479-618eb6fd578f
Client:
 UsernameTemplate: "{{ username }}"
 NetworkAutoDetect: 1
 BandwidthAutoDetect: 1
 ConnectionType: 6
 SplitUserDomain: true
Security:
  PAATokenSigningKey: changeme
  UserTokenEncryptionKey: changeme
  VerifyClientIp: false
Caps:
 TokenAuth: true
 IdleTimeout: 10
 EnablePrinter: true
 EnablePort: true
 EnablePnp: true
 EnableDrive: true
 EnableClipboard: true

The “hosts” section describes all the hosts the server allows access to.

Configuration

After all the files have been created in your chosen directory, you can run

docker compose up -d

After some time it will bring up Postgres and then Keycloak. RDPGW will not come up before we’ve create the new realm in Keycloak.

You will need to handle the reverse proxying of Keycloak on your own, it is outside the scope of this article.

Login to Keycloak with the user you’ve defined in the configuration file and on the top left, create a new Realm:

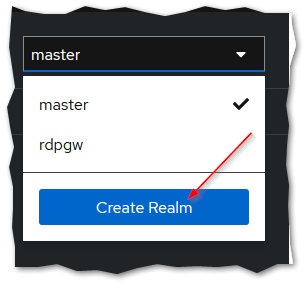
There, you can import the Realm configuration from here.

It will create a realm named “rdpgw” with a single user named “admin@rdpgw” with password “admin” (which you should change promptly)

Once this is done, the RDPGW container should come up.

You should be able to use https://rdgateway.example.com/connect and login with the user “admin@rdpgw”.
It will download a .rdp file, which you should be able to open to connect to the first host in the list.

If you want to connect to a specific host, you should use https://rdgateway.example.com/connect?host=destination-host-url1.com

Categories
Active Directory Azure AD Microsoft 365 Windows Server

Import Microsoft 365 user to on premise Active Directory

This solves a frequent situation: you have an existing Microsoft 365 tenant with users that already are using it, and you want to set-up an Azure AD connect synchronization with an on premise Active directory.

This script will read the AAD user’s attributes, create a local user with matching attributes and set up a mS-DS-ConsistencyGuid attribute that allows Azure AD connect to synchronize the two users.

It is important to note that since we can’t know the AAD user’s password, a new one will need to be set through the script and will replicate to AAD.

<# 
.SYNOPSIS
    Script synchronizes a remote AzureAd users with a local Activedirectory users that it creates

.DESCRIPTION 
    This script will get all attributes from office 365 and add them to a locally created user.
	It will then generate and add an mS-DS-ConsistencyGuid that will allow AzureADConnect to sync the remote and local user.
	User should be created in a non-synced OU and then copied over to a synchronized OU to allow for checks.
	
 
.NOTES 
    A global admin is probably not required but at this stage I'm not sure what permission are actually needed.

.COMPONENT 
    Requires module AzureAD and MSOnline


.LINK 
    https://blog.edzilla.info/?p=88
 
.Parameter usersContainer 
    OU where the user will be created

.Parameter userUPN 
    The UPN of the users we want to import

.Parameter userPassword 
    The password we want to user: password cannot be imported from AAD, so a new one must be set on import.
#>
Param (
	[string] $usersContainer = "OU=Isotoit,OU=Building,OU=No-365,OU=Users,OU=XLG,DC=XLG,DC=grp",
	[string] $userUPN = "toto@toto.com",
	[string] $userPassword = 'Qow65345@@'

)

$UserCredential = Get-Credential
 

#Install Module
Install-Module -Name AzureAD
Install-Module MSOnline
 
#Connect to Office 365 Azure AD
Connect-AzureAD -Credential $UserCredential
Connect-MsolService -Credential $UserCredential

#Add UPN suffixes to local ad
$azureDomains = Get-AzureADDomain
$localForest = (get-addomain).Forest
 
ForEach($domain in $azureDomains)
{
    if($domain.Name -notlike "*onmicrosoft.com")
    {
        Set-ADForest -Identity $localForest -UPNSuffixes @{Add=($domain).Name}
    }
}


function convert-guid {
  param(
    [Parameter(Mandatory=$true)]
    [GUID]$guidtoconvert
  )

  $bytearray = $guidtoconvert.ToByteArray()
  $immutableID = [System.Convert]::ToBase64String($bytearray)
  $immutableID
}


function Add-LocalADObject
{
    ForEach($object in $input)
    {
        write-host $object.ObjectType $object.DisplayName
 
        if($object.UserPrincipalName -like "*onmicrosoft.com")
        {
            write-host "Skipping object " $object.DisplayName "because it does not have a custom logon domain"
            continue
        }
 
        if($object.ObjectType -eq "User")
        {
            $userName, $upn = $object.UserPrincipalName.split('@')
            $upn = "@"+$upn
            New-ADUser -SamAccountName $userName -UserPrincipalName $object.UserPrincipalName -Name $object.DisplayName -DisplayName $object.DisplayName -Path $usersContainer -AccountPassword (ConvertTo-SecureString $userPassword -AsPlainText -Force) -Enabled $True -PassThru
            $filter = "CN=" + $object.DisplayName
        }
 
        $localADObject = Get-ADObject -Filter "UserPrincipalName -eq '$($userUPN)'"
        #Update attributes based on Azure contact
        if($object.GivenName -ne $null){ Set-ADObject $localADObject -Add @{givenName=$object.GivenName}  }
        if($object.Surname -ne $null){ Set-ADObject $localADObject -Add @{sn=$object.Surname}  }
        if($object.Mail -ne $null){ Set-ADObject $localADObject -Add @{mail=$object.Mail}  }
        if($object.StreetAddress -ne $null){ Set-ADObject $localADObject -Add @{streetAddress=$object.StreetAddress} }
        if($object.PostalCode -ne $null){ Set-ADObject $localADObject -Add @{postalCode=$object.PostalCode} }
        if($object.City -ne $null){ Set-ADObject $localADObject -Add @{l=$object.City} }
        if($object.State -ne $null){ Set-ADObject $localADObject -Add @{st=$object.State} }
        if($object.PhysicalDeliveryOfficeName -ne $null){ Set-ADObject $localADObject -Add @{physicalDeliveryOfficeName=$object.PhysicalDeliveryOfficeName} }
        if($object.TelephoneNumber -ne $null){ Set-ADObject $localADObject -Add @{telephoneNumber=$object.TelephoneNumber} }
        if($object.FacsimilieTelephoneNumber -ne $null){ Set-ADObject $localADObject -Add @{facsimileTelephoneNumber=$object.FacsimilieTelephoneNumber} }
        if($object.Mobile -ne $null){ Set-ADObject $localADObject -Add @{mobile=$object.Mobile} }
        if($object.JobTitle -ne $null){ Set-ADObject $localADObject -Add @{title=$object.JobTitle} }
        if($object.Department -ne $null){ Set-ADObject $localADObject -Add @{department=$object.Department} }
        if($object.CompanyName -ne $null){ Set-ADObject $localADObject -Add @{company=$object.CompanyName} }
		if($object.Country -ne $null){ Set-ADObject $localADObject -Add @{c="BE"} }
		if($object.MailNickName -ne $null){ Set-ADObject $localADObject -Add @{MailNickName=$object.MailNickName} }
		if($object.PreferredLanguage -ne $null){ Set-ADObject $localADObject -Add @{PreferredLanguage=$object.PreferredLanguage} }
		Set-ADObject $localADObject -Add @{msExchPoliciesExcluded="{26491cfc-9e50-4857-861b-0cb8df22b5d7}"}
 
        #get proxy addresses
        if($object.ProxyAddresses -ne $null)
        {
            ForEach($proxyAddress in $object.ProxyAddresses)
            {
                Set-ADObject -identity $localADObject -Add @{ProxyAddresses=$proxyAddress}
            }
        }
     }
}
 
#Add users to local AD
if (!(Get-ADUser -Filter "userPrincipalName -like '$userUPN'"))
{
	Get-AzureADUser -ObjectId $userUPN | Add-LocalADObject
}
$user = Get-ADUser -Filter "userPrincipalName -like '$userUPN'"
$immutableID = convert-guid -guidtoconvert $user.objectguid
Set-MsolUser -UserPrincipalName $userUPN -ImmutableId $immutableID
$decodedII = [system.convert]::frombase64string($ImmutableId)
$decode = [GUID]$decodedii
$ImmutableId = $decode
$user | Set-ADUser -Replace @{'mS-DS-ConsistencyGuid'=$($ImmutableId)}

Disconnect-AzureAD
Categories
linux Windows Server

Reverse proxy for Microsoft Exchange or RDS Gateway

When you have a bunch of applications all needing port 443 and a single public IP, you must use a reverse proxy.

For example, you have an Terminal services broker and an Exchange server which both need to use port 443.

You can set up an Haproxy instance that will proxy the request to the appropriate server. This is the configuration we use.
It uses SNI to find the requested hostname and direct you to the appropriate server.

######## Default values for all entries till next defaults section
defaults
option dontlognull # Do not log connections with no requests
option redispatch # Try another server in case of connection failure
option contstats # Enable continuous traffic statistics updates
retries 3 # Try to connect up to 3 times in case of failure
timeout connect 5s # 5 seconds max to connect or to stay in queue
timeout http-keep-alive 1s # 1 second max for the client to post next request
timeout http-request 15s # 15 seconds max for the client to send a request
timeout queue 30s # 30 seconds max queued on load balancer
timeout tarpit 1m # tarpit hold tim
backlog 10000 # Size of SYN backlog queue

balance roundrobin #alctl: load balancing algorithm
mode tcp #alctl: protocol analyser
option tcplog #alctl: log format
log global #alctl: log activation
timeout client 10800s #alctl: client inactivity timeout
timeout server 10800s #alctl: server inactivity timeout
default-server inter 3s rise 2 fall 3 #alctl: default check parameters

global
ssl-default-bind-options no-sslv3 no-tlsv10 no-tlsv11 no-tls-tickets
ssl-default-bind-ciphers ECDH+AESGCM:DH+AESGCM:ECDH+AES256:DH+AES256:ECDH+AES128:DH+AES:RSA+AESGCM:RSA+AES:!aNULL:!MD5:!DSS
ssl-default-server-options no-sslv3
ssl-default-server-ciphers ECDH+AESGCM:DH+AESGCM:ECDH+AES256:DH+AES256:ECDH+AES128:DH+AES:RSA+AESGCM:RSA+AES:!aNULL:!MD5:!DSS
tune.ssl.default-dh-param 2048
log         stdout format raw  local0  info
# turn on stats unix socket
stats socket /var/run/haproxy.stat

listen stats
mode http
log global
bind :9000

maxconn 10

timeout queue 100s

stats enable
stats hide-version
stats refresh 30s
stats show-node
stats auth admin:password
stats uri /haproxy?stats

frontend https-in
bind :::443 v4v6 alpn h2,http/1.1 ssl crt /usr/local/etc/haproxy/certs/
log global
option httplog
mode http
http-response set-header Strict-Transport-Security max-age=31540000

use_backend mail.domain.com if { ssl_fc_sni -i mail.domain.com }
use_backend mail.domain.com if { ssl_fc_sni -i autodiscover.domain.com }
use_backend rds.domain.com if { ssl_fc_sni -i rds.domain.com }
use_backend website.domain.com if { ssl_fc_sni -i website.domain.com }

default_backend mail.domain.com

backend mail.domain.com
mode http
server exchange exchange_server.local:443 ssl verify none maxconn 10000 check #alctl: server exchange configuration.

backend rds.domain.com
mode http
server rds rds_server.local:443 ssl verify none maxconn 10000 check #alctl: server rds configuration.

backend website.domain.com
mode http
server website website_server.local:443 ssl verify none maxconn 10000 check #alctl: server rds configuration.

Categories
Windows Server

Exchange 2010 management console after removing a DC

Recently we removed the Domain Controller in an Exchange 2010 setup.
All the accounts that had launched the management console at some points in the past were stuck with an error about not finding the deleted DC.
The fix was easy: there is a cache file that needs to be deleted in:
%appdata%\Microsoft\MMC\